Showing posts with label Upcycle. Show all posts

Monday, July 28, 2014

Vintage Photo Slide Lampshade & Instructions

Photo Slide Lamp-with light off

 This is a project that I have always wanted to make and it is so easy to do yourself. Here is my list of supplies and photos of my process!

I used a travel theme!

What you need:
-Wire Lampshade Frame, ... this one is a custom UNO Fitter,
           Ring Diameter=9 inch, Fitter Drop 6 inch
           From: ReplacementLampShades.com
       *If I were to make another, I would order the Fitter Drop to be 8 or 9 inch instead of 6 inch. That would make the bulb sit more in the middle of the shade.

-80 to 100 (Square Outer Edge) Photo Slides,
This shade is made with slides held in Landscape direction.
There is 14 slides in a row and 6 rows

-10mm Jump Rings, same metal color as the fitter frame.
This shade used 504 jump rings.

-Hole Punch, 1/16 inch

-Pliers, to open & close jump rings

-Clothes pins, to hold slide rows

-Modern Candle Stick Lamp, 20 inch tall. This one came from Walmart, $25.00


It was great finding vintage family slides in carousel trays!

The light bulb holds the UNO Fitter frame in place.


An old slide viewer made it easier to construct each row.

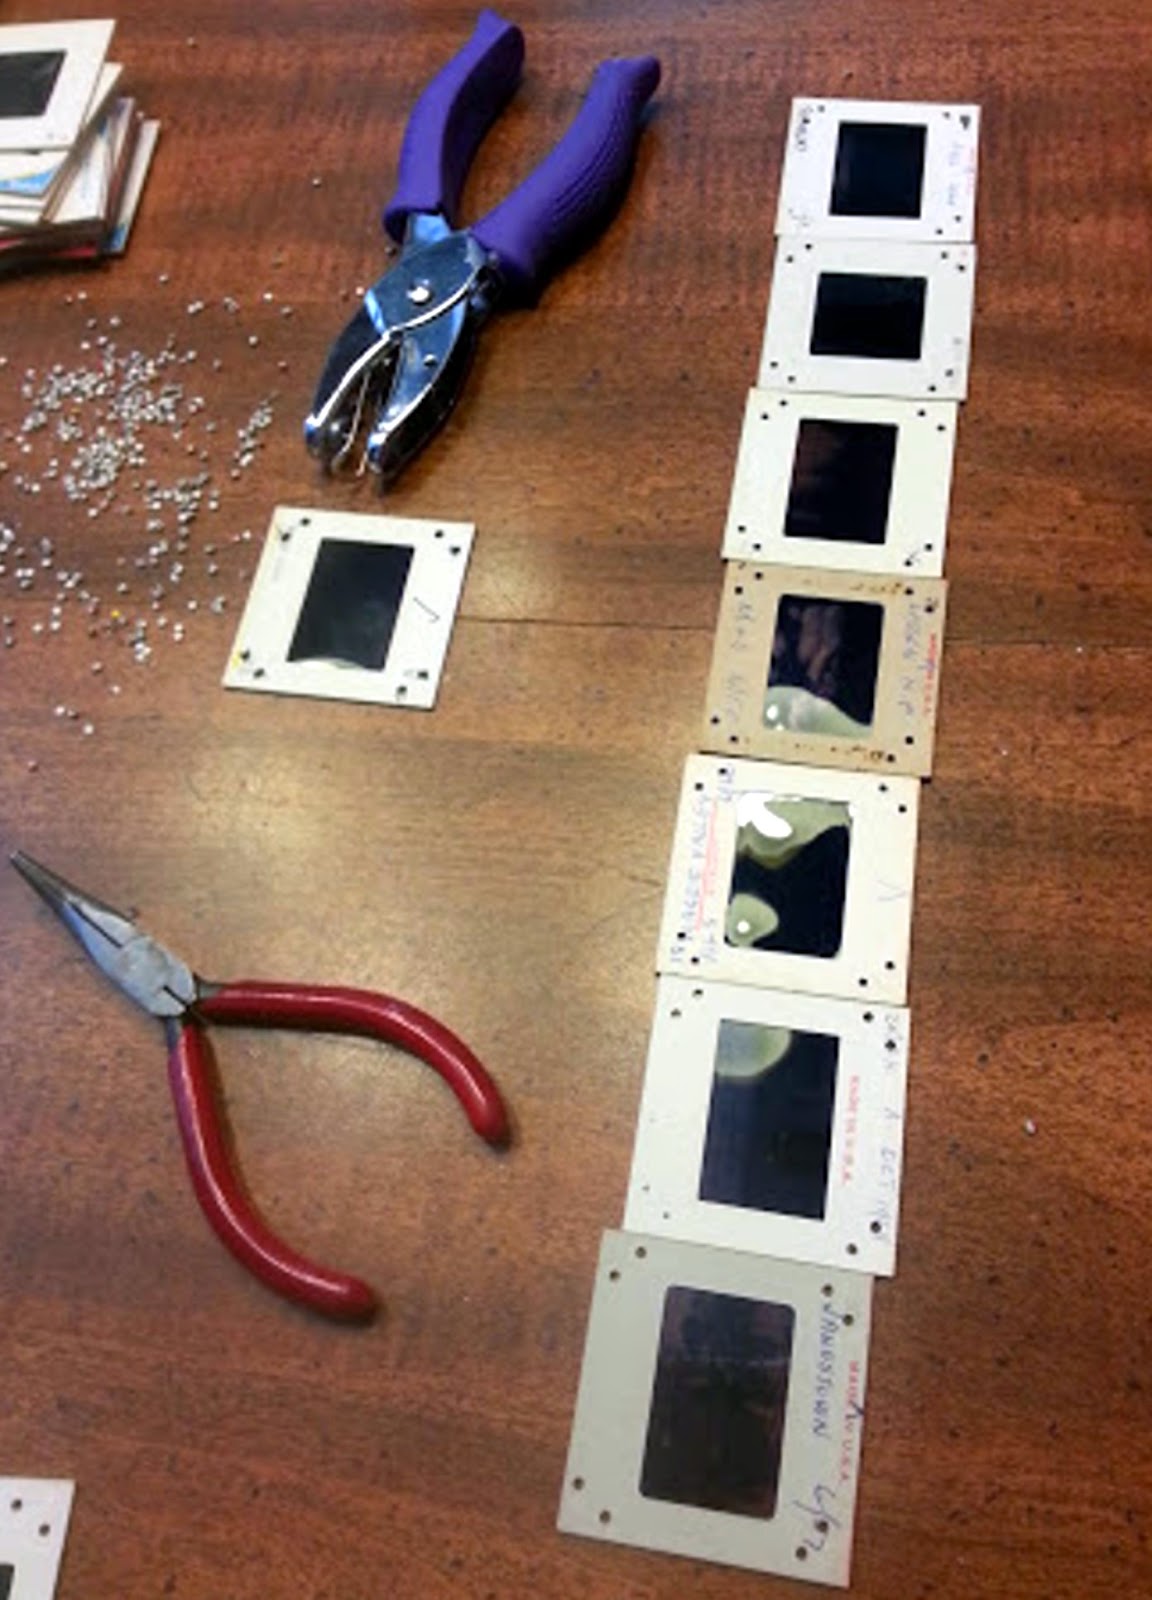
Use an undesirable slide and create an even template. Mark each slide and punch holes.  2 holes per corner creates a smooth shade and makes a nice design when lit.

Create long rows then attach rows together. Clothes pins help to hold rows in place while threading the jump rings.


When all the rows are finished, Fold so short edges are together, then attach jump rings to form a barrel shape


Put the barrel of slides over the Fitter Frame to form the Shade. Have a helper hold the top edge to the frame and attach jump rings by  frame legs 1st. Continue filling in all the holes in between to secure.


Use a low watt bulb

Great for a Dorm Room! My son Loves it!!!

Friday, July 5, 2013

Proud American Sock Doll

Hope you had a wonderful Holiday!

Thursday, June 6, 2013

Vintage Shabby Chic Wedding Cake Topper

I was cleaning out my china cabinet and found my mom's wedding cake dolls. The topper piece was gone but the Bride and Groom looked like they needed a home.I have been making so many special orders for my Shabby Chic Teacup Wine Glasses and it came to me that mix match theme would also be good for a wedding cake topper! So here it is! Enjoy!

Sunday, May 20, 2012

Sock Dolls Ready to Sell on My Etsy!


I have had some good luck my sock dolls lately thanks to my son Kevin!
He posted a link to this blog on Reddit.com and I was able to sell the
Butterfly one on Etsy!
Here are 2 more... Boho and Kitty, ... that I am getting ready to post!
They will be $20.00 plus shipping. Let me know what you think!

Sunday, April 22, 2012

Thursday, April 19, 2012

Sock Doll Obsession

       
My latest obsession, Sock Dolls . . . started when I was looking for a soft doll
 for my daughter. She was pregnant and expecting a sweet girl! I wanted to get her 
1st doll for the nursery. I looked into Waldorf dolls and other stuffies.
 The dolls in the store had faces that I didn't like, ...   with the words "my 1st Doll" 
printed on their clothes. I like the simple German soft dolls on the 
internet the best, but they were pricey. Once I discovered sock dolls on Etsy, 
I knew I would have to make it myself! Here is one of my creations using a 
lone ranger from my son's childhood soccer days! 
Instead of stitching the face ... I painted it! 
Hope you like! 

Tuesday, December 6, 2011

Vintage Phone


I have seen some interesting vintage phones on Etsy. I have a "Sculptura", or more commonly known as the Donut Phone from the 1970's in my bedroom. When I spotted these slimline phones on the clearance rack, I felt inspired to embellish some of my own!   The "Reservation Line" is a white phone decoupaged yellow by using the yellow pages of the phone book. The Poodle is my illustration and it is finished with pink rhinestone trim. The "Hello" phone is also white but covered with gold swirl tissue paper. Vintage phone silhouettes and "hello" in different languages decorate the hand set. Finally, rhinestone trim adds the last touch! I am still working a black phone cover in white pages! It says "Call Your Mother"!!! Hope you like!

Monday, July 4, 2011

Old Windows Hand Painted for a Garden

My sister asked me for help painting a gift for her friend, Dee. She wanted some old windows painted to display in her garden. I love doing this kind of project and I was happy to create a flower design to suit the occasion and also teach her about my new favorite paint!!! I just love these Folk Art Enamels! They are wonderful on glass and the colors are glossy and vibrant! It is great having a family project and quick gift! Happy Birthday Dee!!! Send me some pics of the windows in your garden! Happy 4th of July too!

Monday, January 10, 2011

B-A-C-O-N! Bacon, BACON!!!


My Bacon Journey start just before Halloween 2010. It is my son's senior year of High School and he needed a costume. I found an old magazine that had unique homemade outfits from the previous year . . . Bacon & Eggs from a foodie mag!
We started making a bacon Toga from a white tablecloth using just red and white paint. Then I over-decorated a Steak N Shake hat with bacon labels printed off the Internet! Then, his girlfriend got involved and we needed a costume for her too! Instead of making another hat I thought about what I could create bacon charms out of! I had a bunch of foam meat trays in my recycling bin so I cut them into stripes, punched a hole at one end and shrunk them in the oven! WOW! it was shaped just like cooked bacon! I painted them all white and used red and black to create the realistic effect!
So . . .  Halloween was a big hit and I sold some charms on Etsy too!

Sunday, January 9, 2011

Tea Time!


Here is one of my brainstorm creations from this past holiday season 2010! They are teacups for your tea lover or for your martini lover! I had a teabag tag on each one that had my Logo one side and a "Mar-Tea-ni" Recipe on the other!

I found the cups at the thrift store for 40cents each. The candlestick base was also 40cents! I glued them together and them embellishished the seem with floral glass pebbles. Of course they are hand painted with my bake-on paints first! Enjoy!

Tuesday, January 26, 2010

Valentine Blog Hop 2010

The Create It Green BlogRe-purpose with Love, Valentine
Blog Hop, will be Saturday, February, 6th, 2010. It will start
at noon , EST and showcase Blogs of our Contributors, Design
Team, Followers and Friends! There will also be other games
and awards! For anyone interested in having their blog
featured in the Hop Line-up, Please drop me an email at
cyndilouwho@bellsouth.net . The projects, tutorials and
creations will be upcycling oriented and use recycled items
in the instructions! The projects, descriptions and teaser pics
are due by January 31st, 2010. So plan on joining us for the
fun, Free Digi's and prizes! If you can't make it...not to worry!
the projects will still be there whenever you come by!!!

Tuesday, November 24, 2009

Christmas Blog Hop

The Create It Green Blog Contributors are planning an exciting day of blog hopping, tutorials and prizes on December 5th, starting at 12 noon EST. Please join the Yahoo Group "Create It Green", if you have a blog and would like to participate.We do not sell any products just enjoy trying to help save the planet by recycling, re-purposing and re-using products in our crafts. Many of these projects have things that can be found in your own home so they do not require expensive products.
Please join us!!!

Friday, November 6, 2009

Recycled Bag in a Girl Scout Theme

I was helping a friend put together a Halloween Costume at a thrift store when I spotted this cool purse! It was only $2.00! (It's great since I am having a handbag fetish lately!) I was inspired when my friend told me that Girl Scout Cookies are being sold early this year, so I couldn't resist turning this Babe Bag into something Theme-riffic! The outer portion of the bag is printed cloth, so just gave it a shot of Fabreeze and then looked for images on Google. I was able to print out some vintage pics, logos, cookie copies and box illustrations for the collage. I glued them on the the bag with my favorite Royal Coat Decoupage Glue. I also painted GS berets on the girl's heads. The rhinestones were already on the front of the bag!
Then, I just had to have a cookie! Samoas are my preferred weakness! Doesn't it look good? I impressed myself! Not bad for a bar coaster, broken up toothpicks, paint and hot glue! Click on the pic and see a larger view!
GOT MILK?!

Wednesday, March 25, 2009

Recycle a Snack Can


Here is my new project for Food Donation Money at my husbands tennis match! It is made from a Frito Lay Snack can. There is a slit cut into the plastic lid.

Feed the Kitty means to Contribute money to a pool or reserve, as in I can't make a big donation this year, but I'm willing to feed the kitty something. This term, originating in gambling, incorporates a pun, since kitty can mean "cat" as well as "pool." [Late 1800s]
Related Posts with Thumbnails